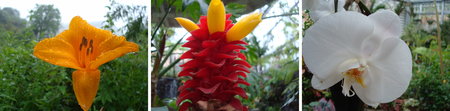
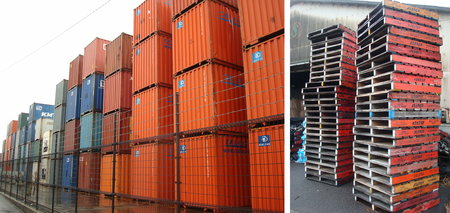
In my posts I often have a need to stitch multiple photos together in a rectangular block. I prefer to have the photos stitched together rather than uploading them as individual images as this removes the need to lay them out (using divs, tables, etc). Plus the stitched together image size is smaller than the size of uploading individual images. This is the kind of image montage I’m talking about.
I always like to have them in a single row, sized to the correct width, with a small white space between the images. Previously I was doing this manually with Paint Shop Pro. Doing it manually takes a while (even when you know all the keyboard shortcuts), is error prone, and is boring to do.
And things get even more difficult if you have a mixture of portrait and landscape images as I’d have to resort to a calculator to work out what sizes each sub-image should be.
I’m no expert with ImageMagick but I managed to put together a script that can do the job automatically. This does it in three steps (three convert commands), but I’ve do doubt that someone who knows ImageMagick well could do it in one much more efficiently – please leave a comment if you know how. This is what it does:
- Resizes the images to a maximum height of 768 pixels (this does assume that the height of all your images is over 768 pixels. If not you can adjust this value). This step sorts out the problem of images being in portrait or landscape. The images are then appended together with whitespace between them.
- I chop off the extra bit of whitespace on the very right of the montage.
- I resize the image to have a width of 450 pixels and save it back out into the same directory as the first image, ready for including on my blog.
I save the intermediate images as PNGs so that the result isn’t being JPEG compressed too many times!
Here’s the DOS batch file code. Some of the code is based on that from a recent post of mine on extracting the directory name from a file path.
goto :skip_functions

:setDir
	if not %imgdir% == "" goto :EOF
	set imgdir=%1
goto :EOF

:getDirectory
	del %TEMP%resize.tmp
	dir %1 > %TEMP%resize.tmp
	for /f "skip=3 tokens=3" %%i in (%temp%resize.tmp) do call :setDir %%i
goto :EOF

:skip_functions

set imgdir=""
call :getDirectory %1

cd %imgdir%
del prout*.*
convert %9 %8 %7 %6 %5 %4 %3 %2 %1 -resize "x768" -background White -gravity east -splice 20x0 +append prout.png
convert prout.png -gravity east -chop 20x0 prout2.png
convert prout2.png -strip -resize 450 -compress JPEG -quality 85 %RANDOM%.jpg
del prout.png
del prout2.png
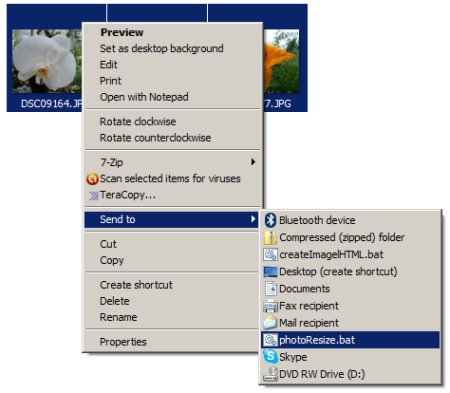
I’ve put a shortcut to this script in my Send To menu (type %APPDATA%MicrosoftWindowsSendTo into the Windows Explorer address bar to get to the folder containing the shortcuts).
I can then right click on whatever images I want to stitch together, choose the photoResize.bat option from the SendTo menu, and the stitching is automatically done for me, and the resulting JPEG left in the same directory as the images.
There are some limitations which you could fix if you really needed to.
- The script assumes that all the images have a height greater than 768.
- It is always outputting to JPEG. It could be changed so that if all the images are in the same format, it outputs that that same format. E.g. stitching together 3 PNGs would output to a PNG.
- I’m using three convert commands which I’m sure is very inefficient. I’ve no doubt this operation could be done with one command.
- The order that the images are stitched together is not defined when using the Send To shortcut.